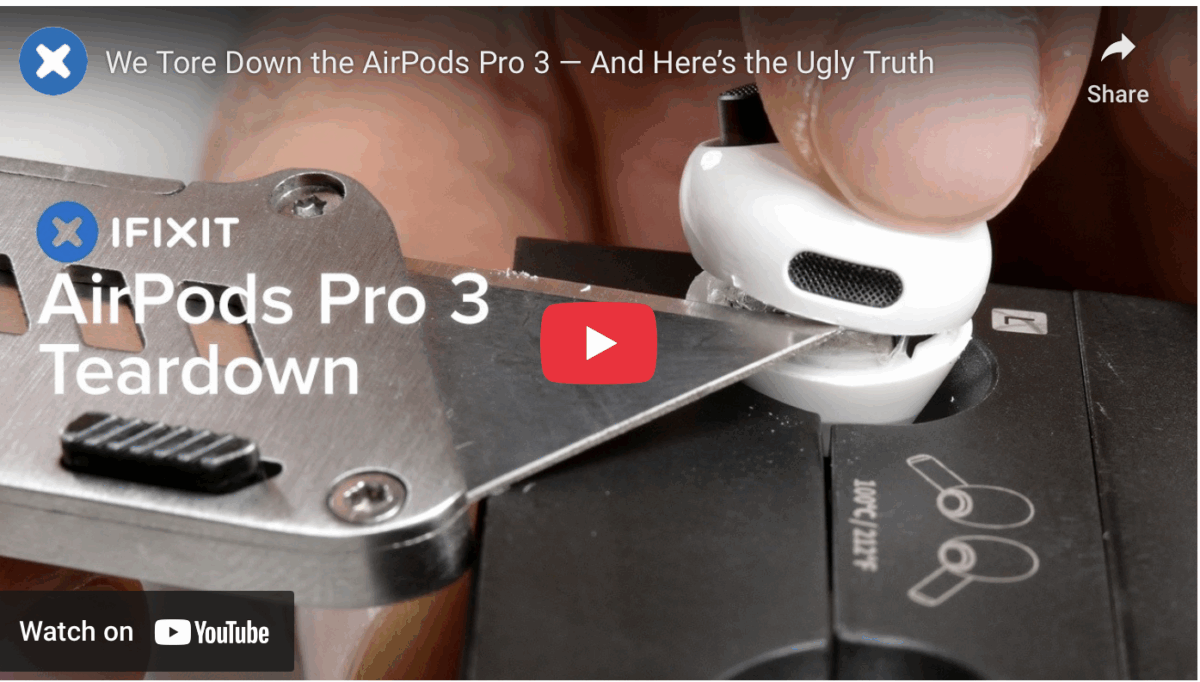
If you were hoping to disassemble and repair Apple’s newly-released AirPods Pro 3 wireless earbuds on your own, it’s time to find another dream.
The cool cats at iFixit on Wednesday published a full teardown of the AirPods Pro 3 units, noting an extremely difficult-to-open design as well as a slew of fragile new components.
The new AirPods Pro 3, which feature a new foam-infused tip, also feature a small layer of foam at the top of the earbud where it meets the ear.
The AirPods have a 0.221 Wh battery cell inside, while the case has a single 1.334 Wh battery. The AirPods Pro 2 had two battery cells inside the case, and the change explains why we’re down to 24 hours of battery life from the case instead of 30 hours like the AirPods Pro 2.
As for the internals, the new case uses fewer rare earth magnets inside, albeit the magnets have been relocated to different locations to ensure that MagSafe and Qi 2 charging still work as expected.
Whatever your technical aspirations with the new AirPods Pro 3 units are, Apple didn’t design them to be repaired, and iFixit stated that they had to essentially destroy the units to open them.
Since the first version of the AirPods was released, Apple has included a battery that is sealed shut with glue. This hasn’t changed with the AirPods Pro 3, and iFixit noted that many repair shops won’t even attempt to do it. The AirPods Pro Charging Case has the same glued-in battery.
The unit offers no way to attempt a battery repair without blemishing the plastic of the earbuds and the casing, which has to be pried open. Heat needs to be used to melt the adhesive, and there’s no easy way to disconnect the flex cable that’s inside each earbud. Given the need for specialized equipment as well as the inability to repair the earbuds and the case without causing damage, the AirPods Pro 3 earned a 0 out of 10 repairability score from iFixit.
In short, you’re going to have to take them to Apple should you need the batteries swapped out or look into a replacement unit.
Once again, the cool cats at iFixit have come through with a mighty teardown report, this time covering the newly-released iPhone 17 Pro.
The teardown, which began with the prying and suction cups, noted the loss of the dual-entry design, which makes repairing the screen and display a bit more difficult. While users can replace the back Ceramic Shield, the only thing they can do with the rear access is to change out the wireless charging coil. Instead, fixes for anything else in the iPhone will have to be done by removing the display first.
Following initial entry, the repair team noted that after removing 14 Torx Plus screws, the battery was now attached to a plate, effectively transforming it into a battery tray. The group noted that Apple is still using electrically-debonding adhesive in this model, and the tray makes it easier to apply the adhesive to the battery and the tray.
The actual debonding process uses 12 volts and takes only 70 seconds to break down the glue.
Regarding the much-hyped vapor cooling chamber, the group noted that its inclusion marks the first time it has been used in an iPhone. The chamber is located on top of the A19 Pro chip, as confirmed by thermal imaging cameras. The technique uses liquid trapped in a reservoir to wick heat away from connected chips and pulls heat away enough to avoid throttling, unlike the cooling system found on the iPhone 16 Pro Max.
A close-up shot of the chamber shows a lattice sandwich that is used to condense the liquid and shift it around the chamber. Copper indentations collect water vapor, which is sent back to the chip along the lattice.
Throughout the repair, the iFixit team, which often complains about Apple’s use of adhesives, noted that the iPhone 17 Pro is seemingly tending to use screws for fastening instead. As such, a mix of tri-point, Phillips, and standoff screws hold the Taptic Engine in place, as well as the speaker module.
Unfortunately, the person repairing the iPhone 17 Pro has to change screwdrivers repeatedly as well as deal with a large quantity of screws. No fewer than 22 screws have to be removed to remove the USB-C port, which is made of plastic and less modular than the iPhone Air’s 3D-printed titanium version.
The upper assembly’s front sensor array is removed by unplugging two press sensors, while three cables hold the rear camera section in place.
Where the logic board itself is removed, the board itself is sandwiched, and is once again located in the top section of the device. The logic board has been given a bit more space this year thanks to the expanded camera bump, or “plateau.”
Following up on complaints from users stating the iPhone 17 Pro is easily scratched, the team began to study the problem with a microscope, noting how the anodization was weakest on sharp and unchamfered corners, namely the edge of the plateau.
While a scratch by a level 4 Mohs hardness tester on a flat surface is visible, it doesn’t peel away the anodization layer. However, on the plateau, the anodization is supported by another anodization layer instead of the aluminum, allowing it to come away.
This effect, noted by Daid Nieburh of Niebuhr Metallurgical Engineering, is known as “spalling.” Niebuhr doesn’t believe it’s due to a change from titanium oxide to aluminum oxide, but instead the design’s sharp edge of the camera bump is to blame.
As such, the brittle nature of the anodized layer, especially when it’s insufficiently supported by the aluminum underneath, can pull away and cause scratches, revealing the aluminum. The scratches on the flat sections without spalling deform properly.
While the new iPhone Air came away with an impressive 7 out of 10 for iFixit’s repairability score, the iPhone 17 Pro is a bit of a mixed bag. The new screw-heavy battery system is great for repairs, but there are complaints about the lack of dual-entry and a tedious USB-C replacement process.
Finally, iFixit granted the iPhone 17 Pro a repairability score of 7 out of 10, citing that it’s marginally less repairable than the iPhone Air, and still takes a fair amount of work to get into. Not the best score in the world and certainly not the worst, but you’ll want to track the screws as you dig into it.
After several years of Macs arriving with their SSDs soldered to the logic board and not immediately upgradable, the M4 Mac mini arrives with a slotted and upgradeable SSD. While Apple doesn’t officially approve of SSD upgrades on the desktop, it’s possible, and the cool cats at iFixit have once again put together an excellent guide as to how to do it.
Where parts are concerned, AppleInsider has pointed out that a 2TB SSD kit from expandmacmini.com can be ordered for $259, and the M4 Mac mini can be carefully pulled apart, the Wi-Fi module can be left in place, and you can easily get to the base components with a good set of Torx screwdrivers. Once the iFixit guide has been followed, the old SSD has been removed, and the new SSD has been installed, perform a DFU restore via the following steps:
To get this done, plug the Mac mini into a display of some sort with the HDMI port.
Hold the power button down.
While holding the power button down, plug the Mac mini into power.
Plug the Mac mini into another functional Mac, with one end of the cable on the middle Thunderbolt port. The restore will fail if it’s on anything but the middle port.
On the host Mac, a window will pop up asking you if it’s okay to connect to the Mac in DFU mode. Allow it to connect, and choose “restore.”
This might be tricky the first time, but it’ll allow the new SSD to be mounted, formatted, and restored to.
If you’ve had a chance to try the upgrade, please let us know about your experience in the comments.
True to form, the super cool cats at repair outfit iFixit have compiled and published a teardown of the 2024 M4 Mac mini, offering additional details as to Apple’s most compact Mac ever.
From the start, iFixit praises how easy the Mac mini is to disassemble despite having a much more compact design. The bottom plate is held on by clips that can be detached without causing any damage. The first thing users will see after removing the bottom plate is the CMOS battery, which can be easily replaced just by removing two screws.
Upon removing a few more screws, users can access the wireless cable modules and can access the inner plate. From there, they have unfettered access to most of the internal components, including the speaker and a large fan that takes up half the internal space.
From its end, Apple redesigned the thermal management of the new Mac mini, so the fan cools the computer by drawing air from the base and circulating it through the components before expelling it. Also, the version with the M4 Pro chip has a larger copper heatsink than the base M4 version.
The 2024 Mac mini features a replaceable storage module that can be easily removed, albeit the M4 Pro version has a larger storage module, so you can’t use it in the M4 version and vice versa.
The USB-C ports and the headphone jack on the front can also be removed, although the same can’t be said for the ports on the back. The logic board is protected with a copper layer for better heat dissipation, and unsurprisingly, the M4 chip has RAM soldered onto it.
Still, iFixit rated the new Mac mini a 7 in its repairability score and cited that the main components are easily replaceable. The 2024 Mac mini is now available online and in stores with the retail price starting at $599.
Stay tuned for additional details as they become available.
The iPad mini 7 is out and the cool cats at iFixit have completed and posted a teardown of the new tablet, as well as explored some of the device’s “jelly scrolling” improvements.
“Jelly scrolling” refers to screen tearing, which can cause text or images on one side of the screen to appear to be tilted downwards because of a mismatch in refresh rates. It can cause one side of the display to look as if it is responding faster than the other side, resulting in a visual disturbance that is hard to ignore once noticed. Some users noticed the effect on the iPad mini 6 when it was used in portrait orientation, which lead to complaints. Others didn’t seem to be bothered by the effect. Apple seems to have worked to reduce the effect, and many reviewers of the iPad mini 7 said the “jelly scrolling” effect was less noticeable or had been removed from the latest iPad mini.
It was speculated that Apple might have rotated the display controller inside the iPad mini 7 to make “jelly scrolling” less visible in portrait orientation. During its teardown, iFixit noted that the display controller’s position has not changed compared to the iPad mini 6. The website concluded that Apple has done some unknown “trickery” to reduce “jelly scrolling,” so it still remains unclear exactly what Apple has done to mitigate the issue.
The published teardown video also noted that the iPad mini 7’s rear Apple logo can be removed, but otherwise the device’s internal design is similar to the iPad mini 6.
If you’ve snagged an iPad mini 7, please let us know about your experience with it in the comments.